 Save
Save Create bakery-worthy gluten-free croissants with irresistibly flaky, buttery layers. This French pastry technique delivers the perfect golden crescent with tender interiors and crisp exteriors. The dough requires careful chilling and folding to develop those signature delicate layers that melt in your mouth. While the process takes several hours due to necessary resting periods, the results rival any traditional Parisian bakery. Serve these warm for breakfast, brunch, or as an elegant treat with your favorite jam or chocolate.
My kitchen counter was covered in a fine dusting of flour at 11pm, the kind of mess that means you have completely lost track of time. I had been attempting gluten-free croissants for months, each batch ending in either flat, sad disks or bread that somehow tasted like cardboard. Then I figured out that temperature matters more than anything—cold butter, cold dough, cold patience. The first time I pulled a tray of actual flaky, golden crescents from the oven, I called my mom immediately and made her come over at midnight to taste one.
Last Christmas morning, my sister took one bite and actually stopped talking mid-sentence. She has celiac disease and had not had a real croissant in seven years. Watching her eyes light up over something so simple made all those failed attempts worth every frustrated moment. Now she requests these for every family gathering, birthday, and random Tuesday.
Ingredients
- Gluten-free all-purpose flour with xanthan gum: The xanthan gum is non-negotiable here—it provides the elasticity gluten normally would
- Almond flour: Adds richness and helps mimic the tender crumb of wheat flour
- Instant yeast: Works faster than active dry and gives reliable results every time
- Cold butter for the butter layer: The absolute key to those delicate layers we are chasing
Instructions
- Make the dough:
- Whisk the dry ingredients together in a large bowl, then mix the warm milk, water, egg, and softened butter in another bowl before pouring into the dry. Mix until everything comes together into a sticky dough.
- First chill:
- Shape the dough into a rough rectangle, wrap it tightly in plastic, and refrigerate for 45 minutes while you prep the butter layer.
- Prepare the butter:
- Slice cold butter into thin slabs, sandwich between parchment, and pound with a rolling pin until you have an even rectangle.
- First fold:
- Roll the dough into a rectangle, place the butter over the bottom two-thirds, fold the top down, then fold the bottom up like a letter.
- Roll and chill:
- Rotate the dough 90 degrees, roll out again, and repeat the folding process two more times, chilling for 20 minutes between each turn.
- Shape and proof:
- After the final chill and fold, roll the dough into a larger rectangle, cut into triangles, and roll each one starting from the wide end. Let them rise in a warm spot until puffy.
- Bake golden:
- Brush with egg wash and bake until deeply golden brown—pale croissants are undercooked and sad.
 Save
Save My friend Sarah brought her kids over last Sunday and they devoured four croissants between the three of them. Her daughter looked up with chocolate smeared across her face and asked if I could teach her how to make them. We spent the afternoon rolling dough and eating the slightly ugly ones fresh from the oven, which honestly is the best way to learn.
Temperature Control Secrets
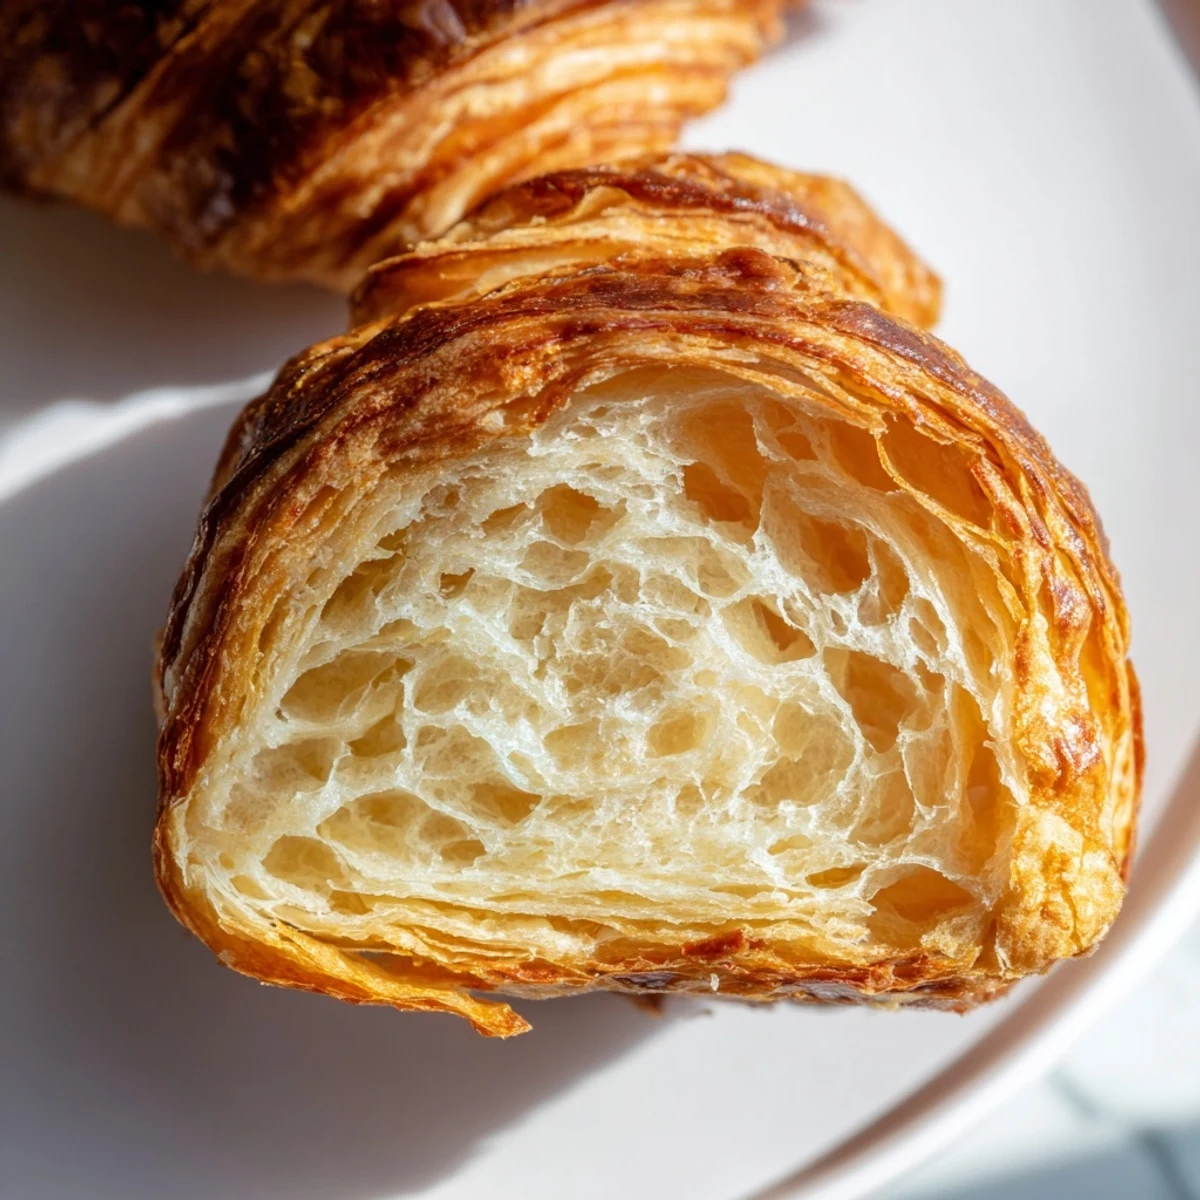
Cold ingredients are what create those distinct flaky layers. When the butter melts between layers of dough, it creates steam and puffs the pastry apart. If everything is too warm, you end up with bread instead of laminated pastry. I work in short bursts and keep returning dough to the refrigerator.
Rolling Pin Confidence
Do not be afraid to use some pressure when rolling. Gluten-free dough can feel fragile, but the xanthan gum gives it surprising resilience. Roll from the center outward, rotating the dough frequently to prevent sticking. A light dusting of flour helps but too much will make the dough tough.
The Waiting Game
Proofing gluten-free dough takes longer than wheat dough and the rise is more subtle. Look for a slight puff rather than dramatic doubling. The oven spring will do the rest of the work during baking. Patience during this stage makes the difference between dense and airy pastries.
- Set a timer for the proofing stage and walk away
- Rush anything and the layers will collapse
- Room temperature butter will ruin everything you have worked toward
 Save
Save There is something magical about pulling a tray of golden croissants from your own oven. The butter hits you first, then the realization that you made something beautiful and delicious from scratch. Enjoy every bite.
Recipe FAQs
- → What makes these croissants gluten-free?
-
These use a blend of gluten-free all-purpose flour with xanthan gum plus almond flour to replicate wheat's structure and elasticity. The xanthan gum helps bind the dough while almond flour adds richness and tender texture.
- → Why is the dough chilled multiple times?
-
Chilling keeps the butter solid during rolling and folding. This creates distinct layers—cold butter releases steam during baking, separating dough into flaky strands. Without proper chilling, butter melts into dough and you lose those signature delicate layers.
- → Can I make these dairy-free?
-
Absolutely. Substitute cold plant-based butter for both the dough and butter layer. Use almond, oat, or coconut milk instead of dairy. The texture remains excellent, though chill times may vary slightly depending on your butter alternative.
- → How do I know when croissants are properly proofed?
-
After the final rise, properly proofed croissants should look visibly puffy and hold a slight indent when gently pressed with a finger. They should jiggle slightly if you shake the pan. Over-proofed croissants may collapse in the oven.
- → Why are my croissants dense instead of flaky?
-
Dense results usually mean butter softened too much during lamination or dough wasn't chilled adequately between folds. Ensure your kitchen stays cool and refrigerate the full 20 minutes between each turn. Using room-temperature ingredients initially also helps achieve proper structure.
- → Can I freeze the dough before baking?
-
Yes. After cutting and shaping croissants, freeze them on the baking tray until solid, then transfer to a freezer bag. When ready to bake, place frozen croissants on a tray and let them thaw and proof overnight at room temperature before adding egg wash and baking.
